Thrusting Tip Construction
Robyyan Torr d'Elandris, OL
A thrusting tip must be of a certain size and resiliency, depending on the
weapon on which it is placed. In Atlantia, at the time of this writing, a one
handed weapon thrusting tip must have one half inch of give under one hand
pressure, two handed weapon thrusting tips must have an additional one inch of
give under full body pressure. All thrusting tips must be at least 2" in
diameter. Spears with a fibreglass shaft must have a tip of at least 3" in
diameter, with 3" of give. This article discusses one method of building a
thrusting tip which 1 have found to be fairly simple, very durable, and uses
easily obtainable materials. The example used throughout is building a thrusting
tip for a one handed sword, but the, method may be modified easily for other
weapons.
Materials needed:
2 - pieces 1/4" closed foam, each approx 1. 1/4" x 1/4"
2 - pieces 1/4" closed cell foam each approx 1 1/2 x 8"
2 - pieces 1" open cell foam, each approx 2" x 12"
strapping tape,
duct tape
Tools needed:
scissors and/or mat (utility) knife
Procedure:
|
|
|
|
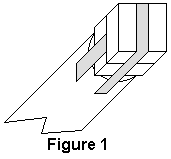
1. Tape each of the 1 1/4" x 1/4" pieces of 1/4" closed
cell foam to the end of the sword, using strapping tape. Your sword will
now look like figure 1. |
 |
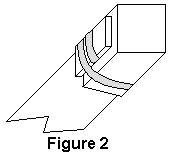 . . |
2. Tape each of the 1 1/2" x 8" pieces of the 1/4"
closed cell foam over the end of the sword, using strapping tape. You
may trim the, ends so they are even if you wish, but be sure there at
least 2 inces of foam down the sides of the rattan. Your sword will now
look like Figure 2. (For a fibreglass shafted spear, repeat this step
two more times, using 2" x 14" and 2 1/2" x 18"
strips of closed cell foam.) |
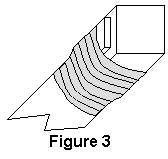
3. Securely and tightly wrap the closed cell foam in strapping tape,
starting on the rattan below the foam, and continuing to just past the
end of the rattan. Your sword should now look like Figure 3. |
 |
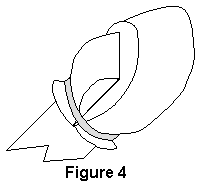 |
4. Tape each of the 2" x 12" pieces of 1" open cell
foam over the end of the sword, using strapping tape. You may trim the
ends so they are even if you wish, but be sure the foam extends down the
rattan at least as far as the closed cell foam, and preferably a little
farther Your sword should now look like Figure 4. |
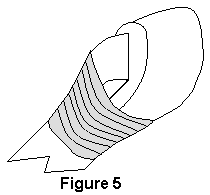
5. Securely and tightly wrap the open cell foam in strapping tape,
starting on the rattan below the foam, and continuing to just jpast the
end of the rattan. Continue taping about half the remainder of the
distance to the end of the foam, but loosen the lightness of the
strapping tape, or the, tip will end up being too small in diameter. Put
another layer of strapping tape on, going in the opposite direction.
Your sword should now look fike Figure 5. |
 |
6. Cover the entire thrusting tip in duct tape, compressing the, open cell
slightly as you do. Be careful you don't compress the open cell foam so far that
the tip gets smaller than 2" in diameter.
7. Mark the, tip with contrasting tape, so your opponents will see it!
And that's all there is to it. You have a thrusting tip that will hit softly
for face thrusts, due to the open cell foam and harder for body thrusts, due to
the closed cell foam backing it up. It should be durable, due to the strapping
tape holding it together, and was made of materials you probably had around.
To modify this technique for other weapons, or other standards of
compression, all you need to do is modify the number and composition of the
layers of foam. The foam I use for closed cell is sleeping bag pads, available
from army surplus stores, and the open cell is widely available in fabric
stores.
Copyright 1990, 2000 by Dennis R. Sherman. Permission granted for
not-for-profit copying and distribution, provided this notice remains attached.

Return to the Greydragon library

 .
.

